Wall Wardrobe Design: 30+ Built-in & Fitted Wardrobe Ideas for Space Optimization
Explore 30+ wall wardrobe designs—built-in, fitted & floor-to-ceiling options. Space-saving layouts, material guide & storage optimization for bedrooms.
Wall Wardrobe Design: The Quick Answer
A wall wardrobe is a built-in storage unit constructed directly into or against your bedroom wall, maximizing vertical space while creating a seamless, clutter-free look.
Short version: Wall wardrobes work best when they go floor-to-ceiling—you're already paying for the carpentry, so use every inch. Sliding doors save about 2-3 feet of clearance space compared to hinged ones. For Indian homes, always specify BWR or BWP grade plywood for the carcass, even if you're inland. The humidity during monsoons catches everyone off guard, and MR grade just doesn't hold up after two or three seasons.
This is right for you if:
- Your bedroom is under 150 square feet and you can't afford floor space for a standalone almirah
- You want that clean, hotel-room aesthetic where storage disappears into the wall
- You're renovating and can plan electrical points around wardrobe placement
- Long-term stay—you're not moving for at least 7-10 years
Skip this if:
- You're in a rental and need to take your furniture when you leave
- The wall has serious dampness issues that haven't been resolved—the wardrobe will just trap moisture and make things worse
Bottom line: A well-designed wall wardrobe gives you 30-40% more storage than a freestanding one of the same width, but only if the internal layout is planned for how you actually live.
What Wall Wardrobes Actually Mean in Practice
A wall wardrobe is a custom storage unit that's fixed directly to your room's wall structure, built from floor level up to—ideally—the ceiling. Unlike a Godrej-style standalone almirah you can shift around, this becomes part of your home.
Most people think wall wardrobes are just about aesthetics. Actually, the real advantage is space mathematics. A freestanding wardrobe needs clearance on all sides—typically 2-3 inches at the back for air circulation, plus you lose the awkward gaps between the top of the almirah and ceiling where dust collects. Wall wardrobes eliminate all that wasted space.
Here's where it gets interesting though. The term "built-in" gets thrown around loosely. True built-in wardrobes have their structure integrated into the wall cavity itself—common in Western homes with cavity walls. In Indian construction, we mostly have solid brick or concrete walls, so what we call "built-in" is technically "fitted" or "wall-mounted." The wardrobe carcass sits against the wall and gets anchored to it. Same functional result, slightly different construction approach.
The carpentry itself involves creating a box structure (carcass) from plywood, adding internal divisions, then fitting shutters. The carcass bears the load—this is where your ply quality matters most. Shutters are mostly aesthetic. I've seen people spend ₹400 per square foot on fancy laminate shutters but use commercial-grade MR ply for the box. Backwards thinking. The box fails first.
Why This Matters More in Indian Homes
Our climate is brutal on furniture. Not dramatic-disaster brutal, but slow-degradation brutal that shows up three years later when your shutter won't close properly.
Mumbai and Chennai operate at 70-85% relative humidity for four to five months straight. Kolkata gets humid AND cold in winter—different kind of stress on materials. Bengaluru is relatively forgiving, but those new apartments with poor ventilation create microclimate problems even there. The Konkan belt, Kerala coast, parts of Tamil Nadu—these are essentially tropical conditions year-round.
What actually happens is: your plywood absorbs moisture during monsoon, expands slightly. Then winter comes, it dries out, contracts. This expansion-contraction cycle loosens joints, warps panels, cracks laminates at edges. After three or four cycles, things start failing.
I've had clients in Thane whose MR-grade wardrobe carcasses swelled so badly by the third monsoon that the drawers wouldn't open. Complete rebuild required. Meanwhile, similar wardrobes in Pune—same design, same carpenter—lasted eight years without issues. Location matters enormously.
Coastal cities need BWR or BWP grade ply. Period. Inland cities with decent ventilation can sometimes get away with better MR grades, but honestly, the price difference is maybe ₹15-20 per square foot. Not worth the risk.
Does the wall itself affect wardrobe longevity?
Absolutely, and this gets ignored constantly. External walls—the ones facing outside—conduct heat and sometimes moisture. An attached bathroom wall carries humidity. The wall behind your bed might seem internal, but if it backs onto a poorly ventilated servant room or store, moisture accumulates. Before finalizing wardrobe placement, check what's on the other side of that wall. Wardrobes against external walls should have a 1-inch air gap or use a moisture barrier membrane behind the carcass. Your carpenter will tell you it's unnecessary. It's not.
Types of Wall Wardrobe Configurations
Not all built-ins are created equal. The configuration you choose affects cost, accessibility, and how much you can actually store.
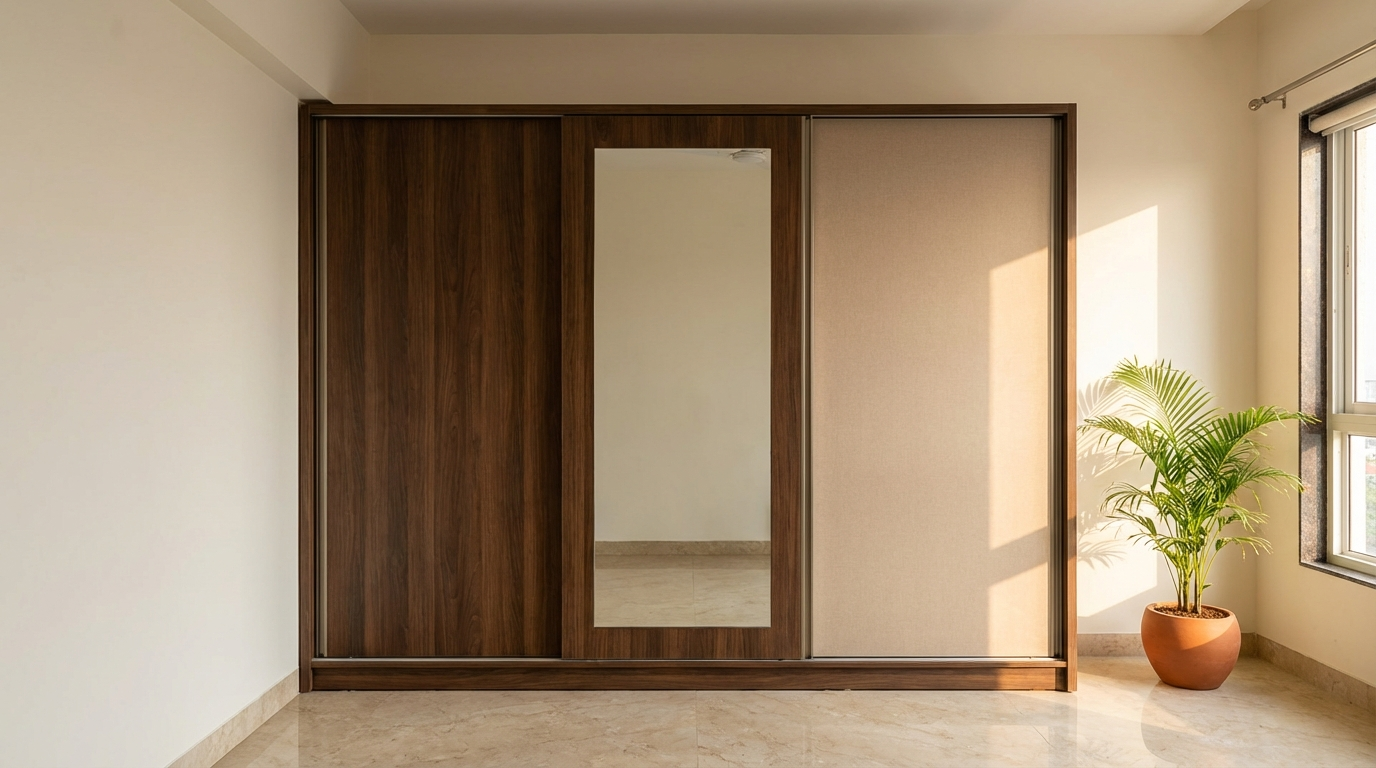
Sliding Door Wardrobes
Best when: Your room is narrow and door swing would block walkways or hit the bed. These need zero clearance in front—the doors slide horizontally on tracks. You lose the ability to see the full wardrobe interior at once (one section is always covered), but in tight spaces, that's an acceptable trade-off.
Track quality matters more than shutter quality here. Cheap aluminium tracks wear out, doors start jumping off. Specify soft-close mechanisms upfront—adds maybe ₹800-1200 per door but prevents that annoying slam.
Hinged Door (Swing) Wardrobes
Best when: You have 2.5 feet or more clearance in front. Traditional, reliable, lets you see everything at once when doors are open. Hinges are simpler to repair than tracks. For large wardrobes, consider breaking it into 3-4 narrow doors rather than 2 wide ones—wide doors sag over time.
Combination Designs
Some sections sliding, some hinged, maybe an open shelf section for daily items. This is what I usually recommend for master bedrooms—sliding doors for the main clothes section, hinged doors for a smaller accessories area, open cubby for bags you use regularly.
Open Wardrobes (No Shutters)
Trendy in design magazines. Practical only in air-conditioned rooms with minimal dust and if you're genuinely tidy. In most Indian homes with windows open half the year, your clothes become dust collectors within weeks. Looks great on Instagram, less great in real life.
| Configuration | Space Needed | Cost Impact | Best For | Avoid If |
|---|---|---|---|---|
| Sliding doors | Minimal—just the wardrobe depth | 10-15% higher due to track hardware | Compact bedrooms, rooms with bed close to wardrobe | You need full visibility often, budget is extremely tight |
| Hinged doors | Add 2-2.5 ft clearance for door swing | Baseline | Spacious rooms, traditional preferences | Room layout doesn't allow door swing |
| Combination | Varies | 15-25% higher | Large wardrobes with different usage zones | Budget is primary concern |
| Open/no doors | Minimal | 20-30% lower | AC rooms, walk-in closets with separate enclosure | Dust is a concern, you're not naturally organized |
Material Selection: What Actually Works
Here's what I tell my clients: the shutter finish is what you'll see daily, but the carcass material is what determines whether this wardrobe lasts 8 years or 18 years.
Carcass Materials
Plywood (BWR/BWP Grade): The standard choice for good reason. BWR (Boiling Water Resistant) handles humidity without delaminating. BWP (Boiling Water Proof) goes further—actual waterproof adhesive. For wall wardrobes, BWR is usually sufficient unless you're on the coast or the wardrobe shares a wall with a bathroom. Thickness: 18mm for shelves and partitions, 12mm acceptable for back panels only.
HDHMR (High Density High Moisture Resistant): Engineered board that's become popular for carcasses. Consistent density means no weak spots, takes screws well, handles moisture reasonably. About 15-20% cheaper than equivalent plywood. Good option for budget-conscious projects where you're using quality shutters. Our HDHMR guide covers this in more detail if you're considering it.
Particle Board: Avoid for carcasses. Fine for internal shelving in dry climates, not for structural elements. Swells irreversibly when wet, screw holding capacity is poor. I've seen so many wardrobe collapses where particle board carcasses gave way—it's not worth the 30% savings.
MDF: Smooth, paintable, but not moisture-friendly at all. Use only for decorative elements or shutter profiles, never for the box structure.
Shutter Materials
This is where design choices come in:
- Laminate on plywood: Durable, huge range of finishes, easy to clean. The workhorse option. Matte laminates hide scratches better than gloss.
- Lacquered glass: Modern aesthetic, very smooth finish. Shows fingerprints instantly though. Needs more careful handling.
- Membrane/PU finish: Allows 3D profiles and routing. Popular for that European shaker-style look. Quality varies wildly—cheap membrane peels within years.
- Acrylic: High-gloss, premium look. Most expensive shutter option. Scratches relatively easily.
- Veneer: Real wood finish without solid wood cost. Beautiful but needs maintenance. Not ideal for humid zones.
My take: For 90% of bedrooms, laminate on marine-grade plywood shutters is the sweet spot. You get durability, variety, and reasonable cost. Go fancy on the finish if you want, but get the substrate right first.
Is mirror on wardrobe doors actually a good idea?
Functionally, yes—you're getting a full-length mirror without taking up wall space. But. Mirrors add weight, require careful mounting, and increase shutter thickness. On sliding doors, heavy mirrored panels stress the track system more. If you want mirror shutters, specify accordingly from the start—the track hardware needs to be rated for higher weight. And please, use safety-backed mirror. Regular mirror shatters into dangerous shards if something hits it. The safety backing adds maybe ₹50-80 per square foot but contains breakage safely.
Price Reality Check (2026 Market)
Wardrobe costs vary wildly because customization means every project is different. But here's a realistic framework:
Carcass cost (material + basic labour): For BWR plywood carcass with standard internal fittings, expect roughly ₹850-1200 per square foot of wardrobe front area. This includes the box structure, basic shelves, one hanging rod section, and simple drawers.
Shutter cost: Add ₹350-600 per square foot for laminate shutters. Acrylic or lacquered glass pushes this to ₹700-1100. Membrane finishes fall somewhere in between.
Hardware: Here's where people underbudget. Quality soft-close hinges, drawer channels, pull-out mechanisms—these add ₹15,000-40,000 to a standard bedroom wardrobe depending on what you specify.
Accessories: Trouser pullouts, tie racks, jewelry drawers, internal lighting—each of these is extra. Budget ₹3,000-8,000 per accessory.
So a typical 8-foot wide, 8-foot tall wall wardrobe in a master bedroom runs somewhere between ₹1.8-3.5 lakhs fully fitted, depending on material choices and internal complexity. The ₹80,000 quotes you see advertised? Either very basic spec, or you're not comparing like-for-like.
Here's what actually affects your final bill: shutter finish (biggest impact), internal hardware quality, number of drawers (more expensive than shelves), and whether you need any special features like a safe compartment or TV unit integration.
30+ Design Ideas by Room Type and Style
Right, this is what you probably came for. Let me break these down by situation rather than just showing pretty pictures.
Small Bedroom Designs (Under 120 sq ft)
1. Floor-to-ceiling sliding wardrobe with mirror: The space-maximizer. Goes right up to 8-9 feet, mirror makes room feel bigger, sliding doors don't eat into limited floor area. Best in light colours—white, cream, light grey.
2. L-shaped corner wardrobe: Uses that awkward corner that usually collects a chair or random stuff. The corner section works great for saree storage or long hanging.
3. Wardrobe with integrated study: Built-in desk section within the wardrobe wall. Seen this work brilliantly in kids' rooms—wardrobe on either side, study station in the middle.
4. Loft + wardrobe combination: Regular wardrobe up to 7 feet, then a loft section above for suitcases and seasonal items. The loft can have lift-up doors to avoid swing clearance issues.
5. Narrow two-door compact: Sometimes you just need a slim wardrobe. 3-4 feet wide, but full height. Works beside beds in narrow rooms.
Medium Bedroom Designs (120-200 sq ft)
6. Three-door hinged with integrated dresser: Middle section has a flip-down mirror and small drawers for accessories. Very practical for couples who share.
7. Walk-to wardrobe with open section: Not a full walk-in, but a wardrobe with one open cubby section for bags, daily items, tomorrow's outfit laid out.
8. Wardrobe with bedside integration: The wardrobe wraps around to include headboard and side tables. Creates a unified wall. Expensive but visually stunning.
9. His-and-hers divided design: Clear left-right division with different internal layouts—more hanging on one side, more shelves on the other.
10. Floor-to-ceiling with profile lights: LED strip lighting in handles or under shelves. Practical and adds a premium look.
11. Combination sliding-hinged: Main wardrobe section with sliding doors, smaller accessory section with hinged doors at one end.
12. Wardrobe with display shelving: Open shelves at one end for displaying items—trophies, photos, decorative pieces. Breaks the monotony of solid doors.
Large Bedroom and Master Suite Designs
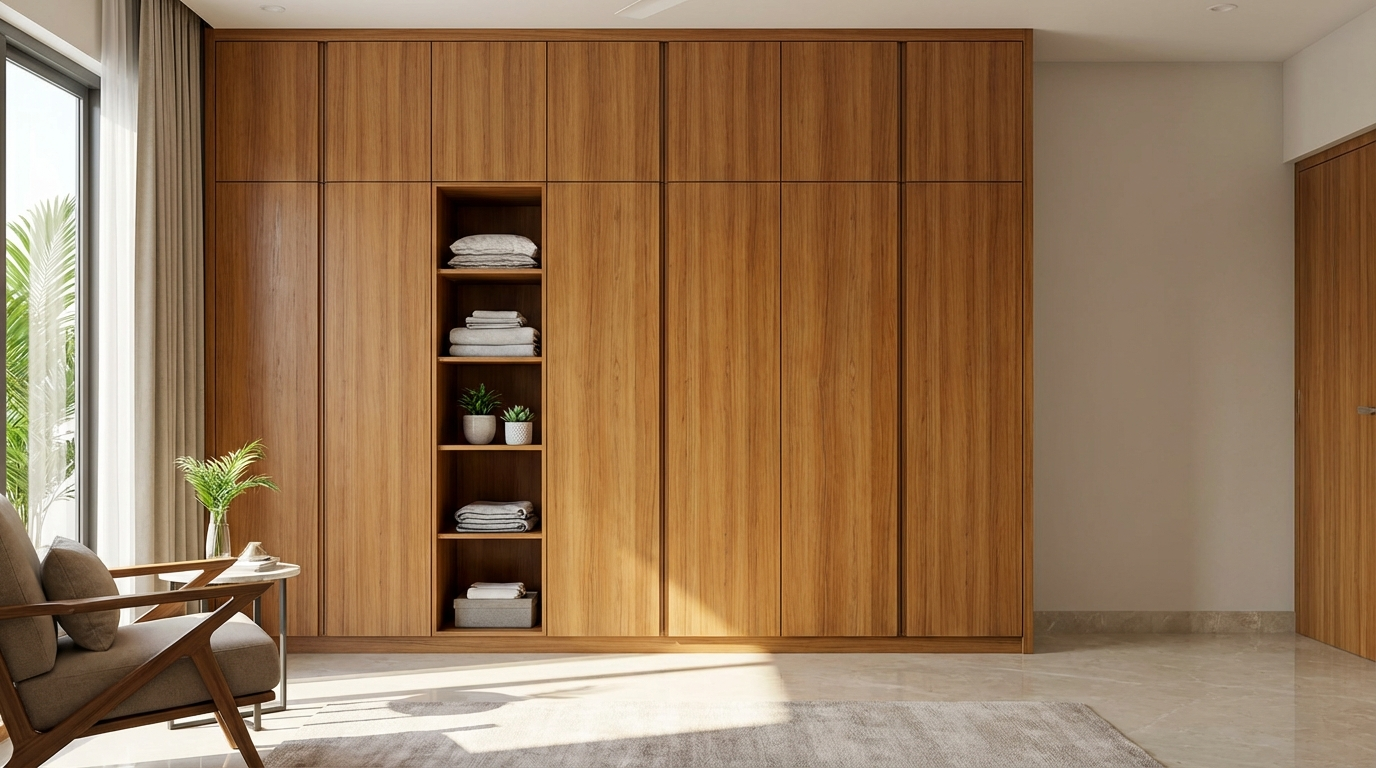
13. Wall-to-wall fitted wardrobe: Covers the entire wall, 12-16 feet wide. Split into zones—everyday clothes, formal wear, accessories, linen. This is the hotel-room look.
14. Walk-in closet with open wardrobes: If you have space for a separate closet room, internal wardrobes can be open or glass-fronted since dust isn't entering a closed space.
15. Wardrobe with built-in safe: Hidden safe compartment within the wardrobe structure. Security through obscurity.
16. Dressing room style: Island drawer unit in center, wardrobes on surrounding walls. The ultimate setup if you have 80+ sq ft dedicated to storage.
17. Wardrobe with TV unit: Middle section houses TV, wardrobes on either side. Works in bedrooms where the wardrobe wall faces the bed.
18. Glass shutter wardrobe: Tinted or frosted glass doors. You can see inside without fully opening—helps find things quickly. Not cheap, but very functional.
19. Handleless push-to-open: Clean, minimal front with no visible handles. Push mechanisms open the doors. Modern aesthetic but mechanisms need quality hardware.
20. Wardrobe with window integration: Built around a window, creating storage on both sides and above. Uses otherwise dead wall space.
Style-Specific Designs
21. Classic wood-look laminate: Walnut, oak, or teak-finish laminates. Traditional aesthetic without solid wood maintenance.
22. All-white minimalist: Matte white throughout. Scandinavian style. Requires more cleaning effort but looks clean when maintained.
23. Two-tone contemporary: White carcass with darker shutter fronts—charcoal, navy, forest green. Very current trend.
24. Industrial style with metal accents: Grey laminates with visible metal handles, exposed hardware aesthetic.
25. Fluted panel doors: Vertically ribbed texture on shutters. Adds visual interest to plain doors.
26. Leather-insert panels: Sections of leather or leather-look material inset into shutter doors. Luxury aesthetic.
27. Back-lit translucent panels: Frosted acrylic sections with LED backlighting. Dramatic effect.
28. Shaker-style membrane: Traditional Western look with raised panel profiles. Popular in contemporary Indian homes now.
29. High-gloss solid colour: Bold single colours—burgundy, emerald, navy. Statement piece approach.
30. Mix-material design: Combination of finishes—wood laminate base, painted upper section, metal detail strips. Complex but visually rich.
31. Curved corner wardrobe: Rounded edges where the wardrobe meets the room corner. Softens the look, requires specialized manufacturing.
32. Pocket-door wardrobe: Doors slide into the wall cavity rather than along the face. Only possible if wall construction allows.
Internal Layout: This Is Where Most People Go Wrong
Honestly, I've seen beautiful wardrobes that are completely impractical inside. The external design gets all the attention, but you live with the internal layout daily.
What you actually need inside:
Hanging space: At least 40-50% of the wardrobe. Divide into full-length hanging (for sarees, dresses, kurtas, long coats) and half-height double hanging (for shirts, folded pants). Standard rod height for half-hanging: 42 inches from shelf above.
Shelves: Not too deep. 16-18 inches is ideal. Deeper shelves mean things get lost at the back. Include adjustable shelf options—your storage needs will change.
Drawers: Essential for undergarments, accessories, small items. Minimum 3-4 drawers for a main wardrobe. Soft-close channels are worth every rupee—you'll open drawers thousands of times.
Specialized sections: Saree trays (10-12 per stack if you have a collection), trouser pullout (for men who wear formal pants daily), tie/belt rack, accessory drawer with compartments.
| Internal Element | Minimum Per Person | Ideal Per Person | Notes |
|---|---|---|---|
| Full-length hanging (width) | 18 inches | 30 inches | More if you wear mostly Indian ethnic wear |
| Half-height hanging | 24 inches | 36 inches | For shirts, folded sarees, short kurtas |
| Shelf sections | 4-5 | 8-10 | Mix of fixed and adjustable |
| Drawers | 2 | 4-5 | Varying depths—shallow for accessories, deep for clothes |
| Dedicated accessory storage | 1 section | 2-3 sections | Watches, jewelry, sunglasses, etc. |
Pro tip: Before finalizing internal design, literally count your hanging clothes, folded clothes, accessories. Then add 30% buffer. People always underestimate how much stuff they have.
Why do carpenters often get internal layouts wrong?
Because they optimize for ease of construction, not ease of use. Equal-height shelves throughout are simpler to build. But you don't need equal heights—shoe shelves should be shorter than sweater shelves. Saree sections need different spacing than shirt sections. The carpenter sees the build; you live with the daily use. Give specific measurements, don't leave it to "standard" sizing. And check the drawing before construction starts—changes mid-build are expensive and frustrating for everyone.
Common Mistakes I Keep Seeing
After 18 years, certain patterns emerge. Here's what goes wrong, repeatedly.
1. Skipping the ceiling connection. Wardrobes that stop at 7 feet look incomplete AND waste storage space. That 2-foot gap above becomes a dust trap. Go to the ceiling, even if the top section is just for rarely-used items.
2. All shelves, no hanging. I get it—shelves are cheaper than rods and hardware. But you'll hate folding everything. Most people need more hanging than they think.
3. Ignoring the wall behind. A client in Vashi had a gorgeous wardrobe installed against an external wall. No air gap, no moisture barrier. Within two monsoons, the back panel was showing mold spots. The wall conducts dampness. Treat it appropriately.
4. Wrong door choice for the space. Had someone insist on hinged doors in a room where the bed was 3 feet away. You literally couldn't open the wardrobe fully with someone sitting on the bed. Measured the space, still went ahead. Regretted it immediately.
5. Drawer channel compromise. This one really frustrates me. You save ₹200 on cheaper channels per drawer. Then spend the next decade fighting sticky, misaligned drawers. Telescopic soft-close channels. Always. The Hettich or Hafele equivalents. Local versions jam within two years.
6. Forgetting electrical requirements. Interior lighting needs wiring. If you might want a safe with electronic lock, need a socket inside. Ironing station near wardrobe needs outlet. Plan electrical BEFORE carpentry finalizes.
7. Dark colors in dark rooms. Deep walnut wardrobe in a north-facing bedroom with one small window. Makes the room feel like a cave. Light-coloured wardrobes in light-challenged rooms. Save the dark drama for well-lit spaces.
8. Matching everything exactly. Wardrobe finish doesn't have to match bed, side tables, flooring precisely. Complementary is fine. That desperate matchy-matchy look is actually dated now.
9. Ignoring ventilation inside. Closed wardrobes need some airflow to prevent musty smells. Either small ventilation holes in back panel (concealed behind clothes) or leave the wardrobe slightly ajar occasionally. I've seen this happen when people seal everything perfectly—clothes start smelling damp within months.
Quality Checks You Can Do Yourself
You're not a carpenter, but you can still verify quality before final payment.
Visual Checks
- Run your hand along all edges—no roughness, splinters, or sharp laminate corners
- Check where panels meet—gaps should be consistent, not varying
- Look at back panel attachment—screwed, not just nailed. Nails loosen over time
- Shutter alignment—close all doors, they should sit flush, not crooked
- Laminate edges—no visible peeling, bubbles, or lifting at corners
- Drawer alignment—all drawers should be level when closed, not tilted
Questions to Ask Your Carpenter
- "What grade plywood are you using for the carcass?" Should be BWR minimum. Ask to see offcuts.
- "Which brand are the hinges and channels?" Reputable hardware brands matter.
- "How is the back panel attached?" Screwed into grooves is better than surface-nailed.
- "What adhesive are you using for edge banding?" Proper PVC edge band with hot-melt adhesive, not cheap tape.
- "Can I see the plywood ISI marking?" Legitimate ply has markings. No marking = suspicious.
Simple Field Tests
Tap test: Tap the carcass panels. Solid ply sounds solid. Particle board or hollow-core sounds different—more echo.
Weight check: 18mm BWR ply feels substantial. If panels feel surprisingly light, question the material.
Edge inspection: Look at exposed plywood edges (inside, behind panels). Good ply shows consistent layers without gaps or voids between plies.
Flex test: Put moderate pressure on shelf centers. 18mm ply over 2-foot span shouldn't flex visibly. Significant flex means either thinner material or poor quality.
Hardware test: Open and close drawers 10-15 times rapidly. Smooth channels maintain smooth motion. Cheap ones start sticking or jumping.
Here's a trick most dealers don't like—ask for a sample offcut of the actual plywood being used, not a showroom sample. The cut edge tells you more than the finished face ever will.
Working with Your Carpenter
The best design fails with poor execution. And execution depends on clear communication.
What to Tell Your Carpenter Upfront
- Share complete drawings with ALL dimensions—don't assume they'll figure out internal layout
- Specify material grades explicitly: "BWR plywood for carcass, minimum 18mm for shelves"
- Name hardware brands: "Hettich hinges and channels only" or equivalent you've researched
- Discuss edge treatment: "PVC edge banding on all exposed edges, not paper tape"
- Clarify finishing expectations: "No visible screw heads on exterior surfaces"
- Set inspection points: "I want to check carcass before shutters are fitted"
Edge Banding: Why This Small Detail Matters
Every cut plywood edge is an entry point for moisture. In our climate, unsealed edges absorb water vapor during monsoon, and that's where delamination starts. PVC edge banding—1mm or 2mm thickness—heat-sealed to edges prevents this. Don't let anyone convince you edge paint is equivalent. It's not.
I've seen carpenters skip edge banding on back panels because "nobody sees it." Wrong. That's exactly where moisture enters first. All edges. No exceptions.
Acclimatization
Plywood delivered to your site needs 3-5 days to acclimatize to your home's humidity levels before cutting. Material that's been sitting in a godown at different humidity will expand or contract after installation if you rush. Good carpenters know this. Bad carpenters will say it's unnecessary to save time.
I had a situation in Borivali where the carpenter cut everything the day material arrived. By the time shutters were fitted, panels had expanded slightly—doors wouldn't close properly. Complete rework. Could have been avoided with patience.
Durability: How Long Should This Last?
A well-made wall wardrobe with proper materials should last 15-20 years minimum before needing major refurbishment. The carcass can last even longer—I've seen 25-year-old plywood structures in good shape where only the shutters needed updating.
What affects longevity:
- Material quality: BWP ply outlasts MR grade by 5-8 years in humid conditions
- Hardware quality: Hinges and channels are the first failure points. Good ones last 10-15 years, cheap ones fail by year 3
- Edge sealing: Properly sealed edges versus unsealed can mean double the lifespan
- Usage patterns: Heavy daily use wears things faster. Guest room wardrobes outlast master bedroom ones
- Maintenance: Occasional hardware tightening, hinge lubrication, keeping interiors dry
Signs it's time to refurbish: Shutters warping and not closing flush, hinges frequently loosening despite tightening, musty smell that doesn't go away, laminate peeling at multiple spots, drawer channels failing repeatedly.
In my experience, well-maintained wardrobes with quality materials last about 18-22 years before people want to replace them—and often that's aesthetic preference rather than structural failure.
Alternatives Worth Considering
Wall wardrobes aren't always the answer. Consider these:
Modular wardrobes: Pre-manufactured sections you assemble. Faster installation, consistent quality, but less customization. Brands like Godrej Interio offer decent options. Good if you're in a hurry or distrust local carpentry quality. Our modular vs carpentry comparison guide covers this extensively.
Freestanding wardrobes: If you're in a rental or expect to move. Good quality standalone almirahs can be moved. You lose the built-in aesthetic and some space efficiency, but gain flexibility.
Open closet systems: If you have a separate dressing area or walk-in space. Metal frame systems with cloth cover are budget-friendly for enclosed spaces. Not for open bedrooms though.
If budget is really tight, consider getting the carcass built properly in plywood but using simpler shutter finishes. You can always replace shutters later. The box structure is what's hard to redo.
Frequently Asked Questions
What's the ideal depth for a wall wardrobe?
Standard depth is 22-24 inches to accommodate hanging clothes without crushing. Anything less than 20 inches and your hangers won't hang straight—clothes will brush against the back and doors. If you're tight on space, you can go 18 inches depth but only for wardrobe sections with shelves and drawers, not hanging.
Can I install a wall wardrobe on a bathroom-adjacent wall?
Yes, but take precautions. Use BWP grade plywood only. Install a moisture barrier membrane between the wall and carcass—a simple polyethylene sheet works. Ensure the bathroom has good exhaust ventilation to minimize moisture migration. And leave that 1-inch air gap at the back. I've consulted on several wardrobe failures where the bathroom wall wasn't treated differently, and every single one had moisture damage within 4-5 years.
Is it true that sliding doors are harder to maintain than hinged?
Somewhat true. Sliding door tracks need occasional cleaning—dust and debris accumulate in the channel and make doors sticky. The rollers wear out over time and may need replacement after 8-10 years. Hinged doors are simpler—just the hinge mechanism to maintain. That said, quality sliding hardware from brands like Hettich or Hafele lasts much longer than cheap alternatives. The maintenance difference is manageable if you invested in good tracks initially.
What if I live in a coastal city like Chennai or Mumbai?
Non-negotiable: BWP grade plywood for all structural elements. Marine-grade plywood is even better if budget allows. Edge banding on every single edge, including back panels. Consider stainless steel hardware instead of regular mild steel—coastal humidity accelerates rust. Apply moisture-resistant primer on the back of panels. And inspect annually for any early signs of moisture damage. Catching problems early prevents expensive repairs later.
How much ventilation does a closed wardrobe need?
Some airflow prevents musty smells and moisture accumulation. Options: small ventilation holes (6-8mm diameter) in the back panel near bottom and top, louvered sections in shutter panels, or simply leaving doors slightly ajar a few times per week. In particularly humid seasons, you can place silica gel packets or activated charcoal bags inside to absorb excess moisture. Ventilation is especially important if the wardrobe houses woolen or silk items.
Is it true that lighter colored wardrobes show dirt more than dark ones?
Common belief: Light colors show dirt, dark colors are practical. Reality: It's actually the opposite for fingerprints and smudges. Dark gloss finishes show every fingerprint dramatically, while matte light finishes hide them better. Dust shows equally on both. The practical winner is matte medium tones—neither stark white nor deep black. Something in the warm grey, light wood, or cream range hides daily wear best.
Should I get separate wardrobes built or one continuous unit?
Continuous is better for wall wardrobes. Gaps between separate units collect dust, look unfinished, and waste space. Build one unified carcass with internal divisions. If the wardrobe is very wide (over 10 feet), your carpenter may need to construct in sections for transport/installation, but it should appear seamless when complete.
What thickness plywood for wardrobe shelves—16mm or 18mm?
18mm for shelves spanning more than 2 feet unsupported. 16mm is acceptable for smaller shelves or if you're adding a center support. Don't go below 16mm for any shelf that will hold weight. For the carcass sides and top, 18mm always. Skimping 2mm saves almost nothing on cost but noticeably affects rigidity and screw-holding strength.
How long does wardrobe installation typically take?
For a standard 8x8 foot wall wardrobe built on-site: measurement and design finalization (1-2 weeks), material procurement (3-5 days), carcass construction (4-6 days), shutter fitting and hardware installation (2-3 days), finishing touches (1 day). Total: roughly 3-4 weeks if everything goes smoothly. Factory-made modular wardrobes install in 1-2 days but require accurate measurements upfront.
What's the cost difference between laminate and acrylic shutters?
Acrylic costs roughly 70-100% more than standard laminate per square foot. On an 8x8 foot wardrobe, that translates to ₹25,000-40,000 additional just for the shutter finish upgrade. Whether it's worth it depends on your aesthetic priorities and budget. Laminate durability is actually comparable to acrylic—both last well if maintained. The difference is purely visual—acrylic has deeper gloss and richer color depth.
Is it true that built-in wardrobes reduce resale value since you can't take them?
Interesting question. Actually the opposite in most cases. Well-designed built-in wardrobes are seen as home improvements that add value. Buyers appreciate not having to commission their own. The key is neutral, quality design—bold personal choices might not appeal to everyone, but classic designs in durable materials are valued. What reduces value is poorly executed built-ins that look cheap or damaged.
Can I add wardrobe sections later to an existing built-in?
Possible but tricky. Matching exact materials years later is difficult—laminate batches vary, plywood shades differ. If you anticipate expansion, plan for it initially. Leave one section as open shelving that can be converted to enclosed later. Or at least get extra material stored for future matching. Adding to an existing wardrobe always shows some seams—better to build the full vision from start if possible.
That covers most of what you need to know. Good luck with the project—and seriously, don't let anyone talk you into MR grade for structural elements. The ₹2,000-3,000 you save will cost you ₹50,000+ in repairs three monsoons later. Seen it too many times.
Disclaimer: This content is provided for general informational purposes based on industry practices and publicly available information. Product specifications, standards, prices, and availability may vary by manufacturer, region, and time. Readers should independently verify details with manufacturers, dealers, or qualified professionals before making purchase or construction decisions.Want Plywood Suggestions?
Share a few details and a Sainik 710 specialist will suggest suitable brands and connect you to responsive dealers.