Kitchen Backsplash Design Ideas: 25+ Tile, Glass & Dado Options for Indian Kitchens
Get 25+ kitchen backsplash ideas—tiles, glass & dado options. Easy-clean materials, pattern ideas & installation tips for Indian kitchen walls.
Kitchen Backsplash Options: The Quick Take
A kitchen backsplash is the protective and decorative wall surface installed between your countertop and upper cabinets—primarily behind the cooking range and sink areas. Short version: For most Indian kitchens, ceramic or vitrified tiles remain the best value for money, but glass dado panels are gaining ground fast because they're seamless, easy to wipe, and handle our intense tadka-style cooking without yellowing. Your choice depends on budget, cooking habits, and how much time you want to spend cleaning grout lines.
This is right for you if:
- You're building a new modular kitchen and want clarity on dado options before the contractor confuses you
- Your existing backsplash has stained, cracked, or the grout lines look permanently greasy—happens to the best of us after 7-8 years
- You've seen Pinterest photos of gorgeous kitchens and want something similar that actually survives Mumbai humidity or Chennai's coastal air
- Budget is flexible and you want to understand what the premium options (stone slabs, lacquered glass) actually offer beyond looks
Skip this if:
- You're just replacing a cracked tile or two—call a local mistri, that's a 20-minute job
- You're looking for branded product recommendations—this is about materials and design principles, not specific brands
Bottom line: The best backsplash for Indian kitchens combines easy cleaning (smooth, non-porous surface), heat resistance (especially behind the gas stove), and moisture tolerance—ceramic tiles tick all boxes at budget prices, but glass panels win for modern aesthetics and zero-grout maintenance.
What "Kitchen Backsplash" and "Dado" Actually Mean
The space between the countertop and the wall cabinet units in the kitchen is termed as the dado area or the backsplash. It acts as a strong focal point of your kitchen design layout. That's the technical definition. In plain terms? It's the wall section that gets all the oil splatters, water splashes, and tomato-based evidence of your cooking experiments.
Most people think dado and backsplash are different things. Actually, they're the same concept—"dado" is more common in Indian interior design circles, while "backsplash" is the Western term that's become universal thanks to home improvement shows. In the world of interior architecture, "dado" refers to the protective cladding on the lower part of a wall, specifically the backsplash area in kitchens that bears the brunt of heat, moisture, and culinary splatters.
Here's what most online guides miss: the dado height matters as much as the material. Standard Indian modular kitchens have roughly 600mm (about 2 feet) of exposed wall between counter and upper cabinets. Some older kitchens have more. Some less. 18- to 24-inch slabs with a small ledge at the top will remain a favorite. But whatever height you're working with, that entire strip needs protection—not just the area directly behind the stove.
Why This Matters in Indian Kitchens Specifically
In Indian kitchens, cooking often involves high heat, frequent spills, and rich spices that can stain or damage untreated walls. This isn't exaggeration. The average Indian cooking session involves tempering oil at high temperatures—what we call tadka—and that microscopic oil spray travels further than you'd think. I've seen backsplash staining 18 inches away from the gas stove.
Indian kitchens deal with spills, oil splatters, and high humidity. Here's how to keep your kitchen wall tiles clean and long-lasting: Opt for stain-resistant tiles (porcelain or glossy-finish tiles).
Now here's where geography comes in. Mumbai and Chennai kitchens face 70-85% humidity for roughly 4-5 months every year. In places like Kolkata, the Salt Lake area can hit 90% RH during monsoons. Bengaluru's relatively drier—maybe 60-65%—but the newer apartments have smaller kitchens with poor ventilation, which creates its own moisture problems.
Coastal Karnataka, the Konkan belt, and parts of Kerala have it worst. I worked on a flat in Panaji once where the client had used regular wall paint behind the sink. Eighteen months later, the paint was peeling, and there was actual fungal growth where moisture had seeped into the wall. Had to strip everything and start over with proper tiles. ₹35,000 lesson.
Does humidity really affect backsplash material choice?
Absolutely. In high-humidity zones—and most of coastal India qualifies—porous materials absorb moisture and become breeding grounds for mildew. The best thing about them is that they resist mould, mildew and staining (requiring just a damp cloth for cleaning). This is why glass and glazed ceramics outperform natural stone in humid climates. Marble, for instance, looks stunning but needs annual sealing in Mumbai—skip that maintenance and you'll see yellow-brown staining within two monsoons. Not worth the headache for most families.
25+ Backsplash Options: Material-by-Material Breakdown
Right, let's get into the actual choices. I'm organizing these from most common to more specialized options.
Ceramic Tiles (The Workhorse)
The most affordable and customisable kitchen backsplash option is the ceramic tile. Available in many prints, patterns and sizes, they can also be painted to give a unique look. This is where 70% of Indian kitchens land, and honestly? There's good reason for that.
Ceramic tiles are easy to clean and maintain. The cons of this type of tile are that the unglazed porous ones can collect dust and grime, and the grout lines in a ceramic backsplash can trap grease and dirt.
My take: For budget-conscious kitchens under ₹8 lakh total, ceramic tiles with a glossy glaze are still the smartest choice. Just don't cheap out on the grouting—epoxy grout costs more but stays cleaner for years longer.
Porcelain Tiles (The Upgrade)
Porcelain Tiles (Best for Durability & Aesthetics) Highly durable, heat-resistant, and moisture-proof. Available in glossy, matte, and textured finishes. Low maintenance and stain-resistant.
Porcelain tiles are much similar to their ceramic counterparts in their benefits. The only difference arises from the different clay and raw materials, firing temperatures and time frames used. Since porcelain uses slightly superior clay, it's stronger and more expensive. Both are easy to install, clean and maintain.
Honestly, if budget allows, porcelain beats ceramic every time. The density is higher, meaning less water absorption. For backsplash behind sinks especially, this matters.
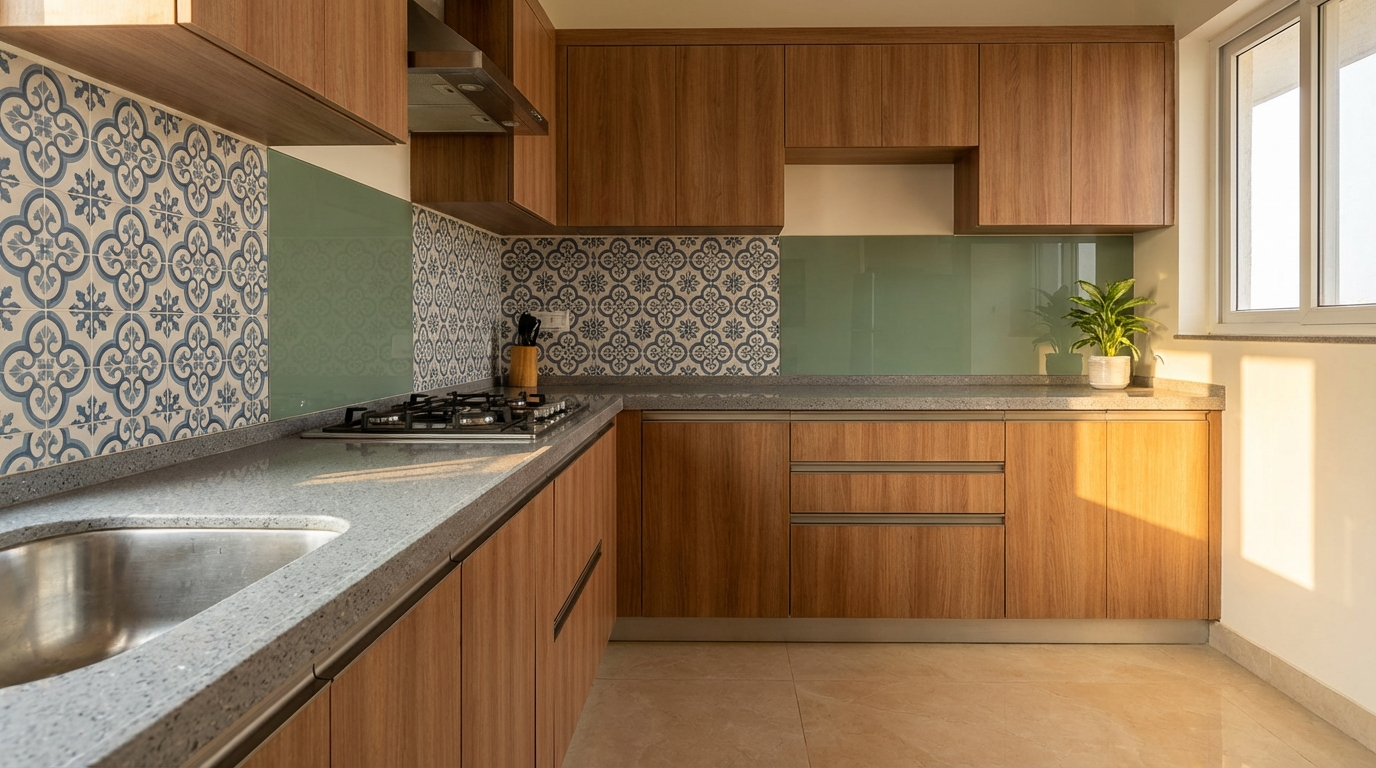
Glass Panels and Glass Tiles
Glass tile backsplashes are slightly transparent, allow you to go bolder with your color choices and add a bit of visual interest. Glass is very easy to clean and maintain.
Glass tiles can be a stunner with their gorgeous colour combinations and tile designs with both glossy and matte finishes. They are available in long panels and are easy to install. They are also simpler to clean because they have very few joints.
Tempered glass tiles can take a fair amount of heat and are scratch-resistant. Also, in small kitchens, having a glass tile backsplash can be beneficial as its surface reflects light and makes a space look bigger.
Types of glass backsplash:
- Back-painted glass: Color applied to the back surface, giving a solid, glossy finish. Most popular in modern Indian kitchens. Very easy to wipe clean.
- Lacquered glass: Colourful and easy to clean, lacquered glass gives you unlimited colour possibilities. A lacquered glass backsplash is created by applying a lacquer coat on the back of the glass resulting in a beautiful, opaque and shiny surface.
- Frosted/textured glass: Hides fingerprints better, softer look
- Printed glass: Custom designs possible—some clients get family photos or patterns printed
Some glass tiles tend to expand and contract a great deal with changing temperatures. Ask the tile retailer or manufacturer if you need to set grout lines slightly wider behind a hot stove. This is crucial—I've seen glass panels crack because the installer didn't leave expansion gaps near the cooking range.
Stainless Steel
Stainless steel dado tiles: Consider using steel dado tiles in your modular kitchen to give it a distinctive metallic appearance. They provide an elegant look to the kitchen besides being highly durable and low maintenance. High-quality stainless steel is easy to clean with a soapy sponge or by using some soap and water on a paper towel or cloth. They are also resistant to heat, chemicals and splatters, making them damage proof and ideal for the dado area of your kitchen.
This will make watermarks and fingerprints show much more prominently, leaving your stainless steel not quite so stainless. Pros: Stainless steel is not only affordable, it's known for its heat-resistant and hard-wearing properties. It's also easy to clean. Cons: Although easy to clean, stainless steel can be difficult to keep looking pristine.
Industrial look, very practical. But here's what nobody tells you—fingerprints. Every. Single. One. Visible. If you have kids, this becomes a daily annoyance unless you go for a brushed finish that hides marks better.
Natural Stone (Marble, Granite, Slate)
Granite is a hard material, resistant to extreme heat, acids and abrasions. It has a natural shine and, once it has been properly sealed, does not easily get stained (nonetheless, spills and splashes should not be allowed to rest on the surface for too long). Due to its smooth surface, dirt and marks can be easily cleaned with a damp cloth. The only drawback to granite as a kitchen backsplash material is that since it is somewhat porous, it requires annual maintenance with a sealer to prevent staining.
Marble is a classy way of adding charm to your kitchen. Not just with aesthetics, but the smooth finish is easier to maintain as it has fewer joints when compared to tiles. However, it is prone to stains and needs regular sealing and waxing. Also, this is an expensive choice and is irreplaceable as every marble slab is unique.
Perhaps the biggest backsplash trend that will rule 2026? Large-scale, stone slabs. "The continuity of material feels elevated, seamless, and both modern and timeless."
Unpopular opinion: Marble backsplashes in Indian kitchens are a maintenance nightmare unless you have household help dedicated to wiping it down after every cooking session. Beautiful? Absolutely. Practical? For most working families—no.
Subway Tiles (Classic Rectangle)
Subway tile has been around for YEARS. It's an absolute classic that fits any design style, and will remain a timeless choice for kitchen backsplash – in my personal opinion. What's new for 2025 and 2026 is how people are using them. Think larger sizes, soft glazes, and vertical or herringbone tile layouts. They work wonderfully in small space kitchens or as a clean backdrop for more colorful elements.
Subway tiles—those rectangular 3"x6" or 4"x8" tiles—have been around since New York subway stations in the early 1900s. They're still relevant because they work with almost any kitchen style. The classic horizontal brick pattern is giving way to vertical stacking and herringbone layouts.
Zellige and Handmade Tiles
Many designers are doubling down on zellige tiles. For Wolman, the tile's handmade, organic quality brings a grounded sensibility to the kitchen. "Their subtle variation and natural sheen bring warmth and character without overwhelming the space," she says. "It's one of the top requests from clients who want something artisanal but still soft and understated."
New York designer Barrett Oswald says zellige tiles can "elevate a smaller backsplash," but she says to err on the side of caution. "In high-use areas like behind cooktops or sinks, it may not provide enough protection," she cautions. "Also, if the transition isn't carefully handled, the overall design can feel abrupt or unfinished."
Zellige tiles are Moroccan handmade tiles with that characteristic slight irregularity and glossy surface. Stunning in low-traffic areas, but the uneven surface can trap oil residue in busy cooking zones.
Mosaic Tiles
Tiny though they might seem, they can have a beautiful impact on your kitchen aesthetics. The best part is that you can create a customised design using coloured tiles. They are not prone to damage easily as their size is small.
Mosaic tiles—those small (usually 1"x1" or 2"x2") tiles on mesh backing—allow intricate patterns and color mixing. Overly glossy, reflective surfaces and small mosaic tiles are starting to feel dated. Clients are leaning toward designs with more depth, variation, and personality. They're slightly falling out of fashion for full backsplash applications, though they still work well as accent strips or decorative panels behind the stove.
Peel-and-Stick Options
This is an easy, budget-friendly, quick and highly versatile choice for homeowners who might want a certain look but might not want to go through the whole grind of installing a brand-new backsplash surface from scratch. The peel-and-stick tiles mimic a large variety of designs, such as steel, glass, stone, ceramic and brick. They are far less difficult to install than traditional tiles, which require hours of time, labour and materials.
Look, I'll be honest—peel-and-stick is fine for rental apartments or temporary solutions. For owned homes where you're planning to stay 10+ years, invest in proper installation. The adhesive on cheaper peel-and-stick products can fail in Indian humidity.
Backsplash Comparison Table: Material vs. Use Case
| Material | Heat Resistance | Moisture Resistance | Cleaning Ease | Cost Range (per sq ft) | Best For | Avoid If... |
|---|---|---|---|---|---|---|
| Ceramic Tiles (Glazed) | Good | Excellent | Easy (grout needs attention) | ₹40-150 | Budget kitchens, rental properties | You want seamless look |
| Porcelain Tiles | Excellent | Excellent | Very Easy | ₹80-300 | Mid-range to premium kitchens | Tight budget |
| Back-Painted Glass | Good (needs expansion gap) | Excellent | Easiest—one wipe | ₹200-500 | Modern modular kitchens, small spaces | Heavy tadka cooking without chimney |
| Stainless Steel | Excellent | Excellent | Easy but shows fingerprints | ₹250-600 | Industrial look, professional kitchens | Homes with kids touching everything |
| Granite | Excellent | Good (needs sealing) | Moderate | ₹150-400 | Matching countertop extension | You forget annual sealing |
| Marble | Good | Fair (porous) | Needs regular maintenance | ₹300-800+ | Luxury kitchens with dedicated help | Heavy cooking, turmeric use |
| Subway Tiles | Good | Excellent | Easy | ₹60-200 | Classic, transitional styles | Seeking unique look |
| Zellige/Handmade | Good | Moderate | Moderate (uneven surface) | ₹400-1000+ | Accent areas, artistic kitchens | Behind cooking range |
Price Reality Check (2026 Market)
Here's what actually affects your final bill—and what most showroom quotes don't explain clearly.
Material cost is only 40-50% of total expense. The rest? Labor, adhesive, grout, edge profiles, and that one corner where the mistri had to custom-cut 17 pieces to fit around the exhaust pipe.
Expect to pay roughly:
- Basic ceramic tiles + installation: ₹80-180 per sq ft all-in
- Premium porcelain + installation: ₹150-400 per sq ft
- Back-painted glass panels: ₹350-700 per sq ft (includes edge polishing)
- Stone slab backsplash: ₹400-1200 per sq ft depending on stone type
- Stainless steel sheets: ₹300-800 per sq ft (gauge thickness matters)
Cost drivers you should know:
- Tile size: Larger tiles = fewer grout lines but higher wastage on cuts. Smaller tiles = more labor time
- Pattern complexity: Herringbone pattern takes 2-3x longer to install than straight lay
- Cutouts: Every electrical socket, switch, or exhaust outlet means precision cutting. Each adds ₹200-500
- Edge finishing: Where backsplash meets open wall (not under cabinets), you need edge trim or bullnose tiles. Often forgotten in quotes.
Budget estimation for standard 10x3 ft backsplash area (30 sq ft):
- Economy: ₹3,000-5,500
- Mid-range: ₹6,000-12,000
- Premium: ₹15,000-35,000+
Design Patterns and Layout Ideas
So here's the thing. Material choice is half the story. How you lay the tiles transforms the look entirely.
Classic Layouts
- Straight/Brick Pattern: Tiles offset by half-width, like brickwork. Safe, timeless, works everywhere.
- Stacked/Straight Stack: Tiles aligned vertically and horizontally in a grid. Modern, clean look.
- Herringbone: V-shaped pattern at 45 degrees. In 2026, expect to see tiles stacked vertically or laid in unexpected herringbone, chevron, or basketweave patterns. Sophisticated but costs 30-40% more in labor.
- Chevron: Similar to herringbone but tiles are cut at angles to meet in a point. Even more labor-intensive.
- Vertical Stack: Subway tiles placed vertically instead of horizontally. Makes ceilings feel higher.
Is herringbone pattern actually worth the extra cost?
Playing with layout direction adds sophistication without changing materials. Yes, but only if your kitchen has enough backsplash area to appreciate the pattern. In compact Indian kitchens (the standard 6-8 ft wall sections), herringbone can look busy. For larger open kitchens—say, 12+ feet of continuous backsplash—it creates genuine visual impact. If your backsplash is broken up by windows, cabinets, and chimneys into small sections, stick with simpler patterns.
Trending Design Approaches (2026)
In 2026, homeowners are embracing bold colors, unique materials, and creative layouts more than ever before.
- Full-height slabs: "We're seeing everything from dramatic full-height slabs that run up to the ceiling, to more understated versions that leave space for a small integrated stone shelf."
- Mixed materials: Mixing two different backsplash tiles, such as a bold, patterned section behind the stove and a more neutral tile elsewhere, is a trend among designers. This creates zones within your kitchen, which is especially appealing in open-concept layouts.
- Textured tiles: Flat, glossy tiles are a thing of the past. Think handmade zellige tiles with imperfect glazes or 3D tiles that play with light and shadow. These tiles create visual interest, especially in neutral kitchens, where texture replace bold colors.
- Countertop continuation: Running the same material from counter to backsplash for seamless effect
How to Choose: Decision Framework
Step 1: Assess your cooking style. Heavy Indian cooking with tadka and frying? Prioritize smooth, non-porous surfaces—glass or glazed ceramic. Light cooking with good ventilation? More options open up including textured tiles and stone.
Step 2: Check your ventilation. No chimney or weak exhaust? Oil residue will settle everywhere. You need the easiest-to-clean surface possible. Back-painted glass wins here.
Step 3: Measure humidity. Coastal city or ground-floor flat with poor airflow? Avoid porous materials. Most kitchen wall tiles, especially porcelain, vitrified, and ceramic, are heat-resistant. They're suitable for areas near stoves, hobs, or chimneys, protecting the wall from heat exposure and reducing the risk of peeling or cracking.
Step 4: Set realistic maintenance expectations. Will you actually seal marble annually? Wipe stainless steel daily? Be honest—most families can't sustain high-maintenance routines.
Step 5: Consider kitchen lighting. Dark kitchens benefit from glossy, light-reflecting surfaces. For Indian kitchens, glossy tiles are ideal as they are easier to clean and enhance brightness.
Decision Matrix
| Your Situation | Recommendation | Why |
|---|---|---|
| Heavy tadka cooking, no chimney | Back-painted glass or glossy porcelain | Single-wipe cleaning, no grout to absorb oil |
| Budget under ₹5,000 total | Glazed ceramic with epoxy grout | Best value, reasonable durability |
| Coastal city (Mumbai, Chennai, Kochi) | Porcelain or glass—avoid marble | Zero porosity handles humidity |
| Modern aesthetic, budget flexible | Large-format porcelain or stone slab | Minimal grout lines, premium look |
| Rental apartment, temporary solution | Quality peel-and-stick or basic ceramic | No permanent alteration needed |
| Open kitchen visible from living room | Statement material—stone or zellige accent | Becomes design focal point |
| Household help available daily | Marble or natural stone okay | Regular wiping prevents staining |
Red flags to walk away from:
- Dealer can't explain water absorption rating
- Glass quoted without tempered/toughened specification
- Installation quote missing grout and adhesive costs
- "Marble-look ceramic" priced as actual marble
- No edge trim discussion for exposed backsplash edges
Common Mistakes People Make
Mistake 1: Choosing based on showroom lighting. Showrooms have perfect lighting. Your kitchen has a window on one side and tube light on the other. That gorgeous textured tile with subtle variations? It'll look different—sometimes duller, sometimes harsher—under your actual kitchen lights. Always ask for samples to take home.
Mistake 2: Forgetting about grout color. This one really frustrates me. White grout between white tiles looks amazing on day one. By month six, especially near the stove, it's turned yellowish-grey. Dark grout or epoxy grout costs maybe ₹500-800 more but saves years of frustration.
Mistake 3: Undersizing the backsplash area. Some contractors install tiles only behind the stove, maybe 2 feet wide. Bad idea. Oil splatters travel. Water splashes from the sink reach further than you think. Cover the entire wall between counter and upper cabinets. There was this flat in Kandivali where the client saved ₹4,000 by doing partial backsplash. Two years later, the painted portion had grease stains that wouldn't come off. Full re-tiling ended up costing ₹12,000.
Mistake 4: Ignoring the hob cutout zone. Built-in hobs need precise cutouts in the backsplash directly behind them. Many times I've seen tiles installed, then the hob guy comes and says "this needs to be cut" and you end up with ugly patched work.
Mistake 5: Skipping the sealing on natural stone. "The dealer said it's sealed already." Sure, factory sealing exists. It also wears off within 12-18 months of actual kitchen use. Re-seal annually or accept staining.
Mistake 6: Not planning for the chimney/hood. Backsplash should extend behind the chimney hood properly. That small gap between hood and tiles? Grease accumulates there. Plan the tile layout considering hood placement.
Mistake 7: Matching exactly with countertop. Matching materials sounds logical but can create a monotonous look. A slight contrast—same color family, different finish or material—often looks more intentional and sophisticated.
Mistake 8: Assuming "waterproof" means maintenance-free. Even waterproof materials need cleaning. Clean tiles regularly with a damp cloth and mild detergent. Use grout sealants to prevent dirt and grease buildup.
Quality Checks You Can Do Yourself
Visual inspection before purchase:
- Check 4-5 tiles from different boxes—color should be consistent (minor variation okay, significant difference means batch problem)
- Look at edges—chips, rough spots indicate quality issues
- Place tiles face-down on flat surface—all corners should touch evenly (warped tiles cause installation nightmares)
- Glossy tiles should have uniform sheen, no cloudy patches
- Pattern alignment should match across tiles
Questions to ask the dealer:
- "What's the water absorption rating?" (For backsplash, under 3% is good, under 0.5% is excellent)
- "Is this tile rated for kitchen use or just walls?" (Some decorative tiles can't handle heat)
- "What grout width do you recommend for this tile?"
- "Do you have installation guidelines from the manufacturer?"
- "What's your replacement policy if tiles arrive damaged?"
Simple field tests:
- Water drop test: Place a few drops of water on tile surface. On good glazed tiles, water beads up and doesn't absorb. If it soaks in within 30 seconds, that's a porous tile.
- Tap test: Tap tile with knuckle. Dense tiles produce a sharp, clear sound. Hollow or dull sound can indicate air pockets or lower density.
- Scratch test: Use a coin on an unglazed area (usually back). If it scratches easily, it's softer material.
Warning signs at the showroom:
- No clear pricing—everything "depends on quantity"
- Can't provide ISI certification for tiles
- Pressuring you toward specific brand without explaining why
- Installation "not included" but mandatory through their team
- No return policy on unused tiles
Here's a trick most dealers don't like—ask for the manufacturing date. Tiles stored improperly for 2+ years can have degraded glaze. Fresh stock is always better.
Installation: What to Tell Your Carpenter and Tile Guy
Your backsplash installation checklist:
- Surface preparation: Wall must be flat, clean, and primed. Any undulations show through tiles. Old paint should be scraped, not tiled over.
- Layout planning: Decide cut tile placement before starting. Cuts should go in corners or less visible areas—not in the center where eyes naturally rest.
- Adhesive selection: Cement-based tile adhesive for ceramic/porcelain. Specialized adhesive for glass. Mirror mastic for back-painted glass panels.
- Spacing consistency: Use proper tile spacers. Even 1mm variation becomes visible over a long run.
- Grout timing: Wait 24-48 hours after tile setting before grouting. Rushing causes issues.
- Sealing: Grout should be sealed after curing (usually 72 hours). Tile surfaces (if porous) need separate sealing.
For glass panel installation specifically:
- Leave 2-3mm expansion gap around edges
- Use flexible silicone, not rigid adhesive, for areas near heat sources
- Panel edges should be polished or beveled—raw edges are safety hazards
I've seen carpenters skip surface leveling because "tiles will cover it anyway." Big mistake. On one project in Thane, the wall had maybe 5mm undulation. The tiles went up fine, but six months later, three tiles had popped off because the adhesive couldn't bond properly to the uneven base. Proper prep takes an extra day. Worth it.
How Long Different Backsplashes Actually Last
Ceramic tiles: 15-25 years easily, often longer. The tiles themselves rarely fail—it's the grout that degrades first.
Porcelain tiles: 20-30+ years. More durable than ceramic, better color retention.
Glass panels: 10-15 years typically. The glass lasts forever but the back-painting can fade near heat sources over time.
Stainless steel: 20+ years functionally, though the finish ages and develops patina.
Marble: Indefinitely if properly maintained. Without maintenance, visible degradation within 5-7 years in Indian kitchen conditions.
What affects longevity:
- Installation quality (70% of early failures trace back to poor installation)
- Ventilation—kitchens with proper exhaust age better
- Cleaning habits—harsh chemicals damage grout and tile glaze over time
- Water quality—hard water areas see more mineral deposits and staining
Signs it's time to replace:
- Multiple cracked tiles (one or two can be replaced individually)
- Grout discoloration that won't respond to cleaning
- Tiles separating from wall
- Persistent mold/mildew despite cleaning
- Style feels dated and you're doing overall kitchen renovation
Alternatives Worth Considering
If budget is tight: Quality paint with a gloss sealant coat. Sounds crazy, but modern oil-resistant primers and washable paints have improved dramatically. Not as durable as tiles, but for temporary situations or extremely tight budgets (say, under ₹2,000 total), it works. You'll need to repaint every 3-4 years though.
If you need better moisture resistance: PVC panels designed for kitchen use. Waterproof, available in tile-like patterns, cheaper than actual tiles. Downsides—looks plastic up close, not heat resistant near direct flame, lower perceived value.
If you want premium without marble maintenance: Engineered quartz or composite stone backsplash. Same look as natural stone but more uniform, less porous, and easier to maintain. Costs similar to mid-range marble. Our kitchen countertop guide covers the differences between engineered and natural stone in detail.
For those considering the countertop-to-backsplash flow where the same material continues up the wall, our guide on kitchen countertop materials explains which stones handle this application best.
FAQs
What's the minimum height for kitchen backsplash?
At bare minimum, cover 4 inches (100mm) above the countertop—this catches most splashes. But honestly, that looks incomplete. Industry standard is full coverage between counter and upper cabinets, typically 18-24 inches. If you don't have upper cabinets in some areas, extend at least 30-36 inches up. Anything less looks like you ran out of budget midway.
Is it true that glass backsplash cracks easily from heat?
Common belief: Glass will crack from stove heat. Reality: Tempered/toughened glass handles kitchen heat without issues. Regular glass? Yes, thermal shock can crack it. Always confirm you're getting tempered glass—it's typically 4-5x stronger than regular glass. The key is proper installation with expansion gaps (2-3mm minimum) around edges near heat sources. However, poor-quality glass tiles can get scratched and might break under force.
Can I install new tiles over existing backsplash?
Technically possible if existing surface is firmly bonded and level. Practically? I'd advise against it for kitchens. The added thickness affects countertop junction, under-cabinet clearance, and outlet box depths. Plus, if old tiles fail later, everything comes down together. Better to remove old tiles, prep surface properly, and start fresh. Extra ₹2,000-3,000 in removal costs saves future headaches.
What if I live in a coastal city like Mumbai or Chennai—does that change anything?
Absolutely. Humidity plus salt air accelerates degradation of porous materials. Marble and limestone are particularly vulnerable—I've seen beautiful marble backsplashes in Bandra develop rust-like staining within two years because moisture penetrated the stone and reacted with iron content. Stick to non-porous options: glazed porcelain, glass, stainless steel. If you must use natural stone, budget for quarterly sealing, not just annual.
Is it true that dark tiles make kitchens look smaller?
Not necessarily. Dark tiles with glossy finish still reflect light and can look sophisticated in well-lit kitchens. What actually makes spaces feel cramped is too much pattern or texture in a small area. A 6x8 ft kitchen with busy Moroccan patterns on the backsplash, patterned floor tiles, AND patterned granite? Visual chaos. For small kitchens, either keep backsplash neutral and add pattern elsewhere, or vice versa. Black & Dark Grey – Modern and luxurious, but needs good lighting.
How do I clean grout that's already stained?
For light staining: baking soda paste applied with toothbrush, scrub gently, rinse. For stubborn stains: diluted oxygen bleach solution (not chlorine bleach—it damages colored grout). Leave for 10 minutes, scrub, rinse thoroughly. For grease-embedded stains near the stove: commercial grout cleaner with degreasing agents. If nothing works after multiple attempts, you're looking at grout replacement—not pleasant but doable without changing tiles.
Should backsplash match floor tiles exactly?
No. In fact, matching everything perfectly often looks flat and uninteresting. Design principle: coordinate, don't match. Same color family, different material or finish works well. For example, grey porcelain floor tiles coordinate nicely with grey subway tiles on the backsplash—similar palette but distinct visual identity. Using the same tiles for the backsplash and the floor can create a seamless, cohesive look. Options like Neo Bianco or Statuario Natural are great for this approach. This design choice works particularly well in open kitchens, where the continuity helps define the space. That said, if you want the full seamless look, it can work in open-plan kitchens.
What's the difference between vitrified and ceramic tiles for kitchen use?
Vitrified tiles are essentially ceramic tiles fired at higher temperatures with added silica and clay, making them denser and less porous. For backsplash applications, both work fine since wall tiles don't face foot traffic. The main practical difference: vitrified tiles have more consistent color (the color goes deeper), so any chip is less noticeable. Ceramic is cheaper. For most kitchen backsplashes, quality glazed ceramic performs perfectly well.
Is stainless steel backsplash too industrial-looking for home kitchens?
Depends entirely on overall kitchen design. You would have seen stainless steel backsplashes in restaurants and other large-scale cafes. However, its popularity is spreading to home interiors too. In minimalist, modern kitchens with handleless cabinets and neutral tones, steel looks intentional and sophisticated. In traditional wood-heavy kitchens, it can feel out of place. Also consider: steel works better as a full wall statement rather than partial application. A small steel section surrounded by tiles looks odd.
How soon after installation can I start using the kitchen?
Light use (wiping, nothing heavy on backsplash): 24 hours after grouting. Full kitchen use: 48-72 hours. Don't splash water heavily on newly grouted areas for at least 72 hours—grout needs to cure. For glass panel installation, wait 24 hours before putting any pressure on panels. This part is critical—I've had clients start cooking the same evening after morning installation and wondering why tiles shifted. Patience.
Are peel-and-stick backsplashes worth it?
For the right situation—yes. Rental apartments where you can't permanently alter walls, temporary housing, or testing a look before committing to permanent installation. If you're in a rental or need a budget-friendly upgrade, peel and stick tiles are a great, practical choice. The latest designs for these include mosaic tile patterns, glass tiles, and even mother of pearl finishes. Quality varies wildly. Cheap ones peel within months in Indian humidity. Mid-range options from established brands can last 2-3 years. Still not comparable to proper installation for permanent homes.
What grout color should I choose?
Practical advice: go one shade darker than your tile color. White tiles? Light grey grout. Beige tiles? Darker beige or tan grout. This hides staining better while maintaining contrast. For very dark tiles, matching dark grout creates seamless look. White grout is only sensible for bathroom-level maintenance (wiping after every use) or if you're using epoxy grout which resists staining much better than cement-based grout.
Final Word
The backsplash is one of those kitchen elements where getting it right the first time saves significant hassle later. You don't want to be chipping out tiles three years from now because grout staining is driving you crazy. Measure properly, pick materials suited to your actual cooking habits—not the aspirational cooking habits you imagine—and don't skip the edge finishing. Oh, and take photos of the tile layout before installation starts. Your future self will thank you when something needs repair five years later.
Disclaimer: This content is provided for general informational purposes based on industry practices and publicly available information. Product specifications, standards, prices, and availability may vary by manufacturer, region, and time. Readers should independently verify details with manufacturers, dealers, or qualified professionals before making purchase or construction decisions.Want Plywood Suggestions?
Share a few details and a Sainik 710 specialist will suggest suitable brands and connect you to responsive dealers.